

A scanned menu item is more useful when you can find it again. Some restaurant meal macro estimator apps let you scan menu items, estimate calories and macros, customize a dish, and save it for later. The right option depends on which features you need.
It’s reasonable to expect an app to do more than show a nutrition estimate. You may also want to adjust ingredients or portions, then save the updated item for another visit. Since estimates can vary, scanning and customization tools matter as much as the ability to save a meal.
This comparison explains what to look for in apps that scan restaurant menus, estimate nutrition, support dish changes, and save items. It also shows how to compare these features and choose an option that fits the way you plan and log meals.
Key Takeaways
- Compare apps by whether they can scan menu text, estimate calories and macros, and let you edit dish details.
- Use restaurant nutrition calculators when available to refine an estimate, and account for ingredients that may not be visible on the menu.
- Review sauces, dressings, toppings, and portion size separately because customization can change a meal’s nutrition profile.
- Check whether scanned or edited menu items can be saved, so you can return to them and log them again later.
- For unfamiliar dishes, break the meal into ingredients and consider its cooking method and portion size when estimating.
Can an app read a restaurant menu and give calorie estimates?
Some tools read menu details and estimate calories and macros. Compare how each option sources its nutrition data, handles meal selections, and supports tracking against your targets.
Restaurant Nutrition Calculators
A restaurant nutrition calculator estimates nutrition based on menu items and ingredient selections. Unlike a general photo estimate, it may use information published on the restaurant’s official website. Select the dish and components that match your order, such as the main, side, and dressing. Then compare the calories and macros with your daily targets.
For example, a restaurant calculator can distinguish a meal with a side salad from the same main served with a different side. This is useful for comparing listed combinations before ordering.
Restaurant Nutrition Data Sources
Nutrition figures from a restaurant’s official website reflect its published menu information. They can be more specific than estimates based only on a dish name or photograph. The key difference is the source and level of detail: published item data describes a listed dish, while photo-based estimates interpret what appears in an image.
Match the calculator’s selections to your order, including sides and sauces. If the menu describes a dish without providing nutrition details, use the description to identify its ingredients and preparation method.
| Option | Nutrition source | Customization | Tracking use |
|---|---|---|---|
| Restaurant calculator | Restaurant website information | Listed menu selections | Record the result |
| Photo estimator | Recognized foods in an image | Edit identified components | Log the estimate |
| Manual food entry | Selected food records | Ingredient-level changes | Record each component |
| Nutrition tracker | Saved or entered items | Depends on entry | Review daily totals |
Choose the option that matches the available menu information and the level of editing you need.
AI Meal Estimate Limitations
AI estimates can misread menu text, miss ingredients, or misjudge portions in a photo. Cooking fats and sauces may be hidden from view. Treat the result as an estimate, compare it with the restaurant’s published nutrition information, and correct the entry if the listed ingredients differ from your order.
Daily targets provide context for a restaurant estimate. For example, a glass of wine contains approximately 120 to 180 calories, depending on size. Include drinks as separate entries so they are not omitted from the meal total. The same method applies to sides or add-ons that do not appear in a main dish’s listing.
Connections to fitness trackers can reduce repeated entry by transferring logged meals. If your tools don’t connect, enter the meal’s calories and macros manually. The most useful workflow records the dish and its components within the tracking routine you already use.
Finding restaurant meals that fit calorie and macro targets
Compare listed meal estimates with your own calorie and macro targets. Item-level figures help identify trade-offs between calories, protein, carbohydrates, and fat. Use the dish description and serving details to make sure each comparison reflects a similar order.
Chain Restaurant Meal Estimates
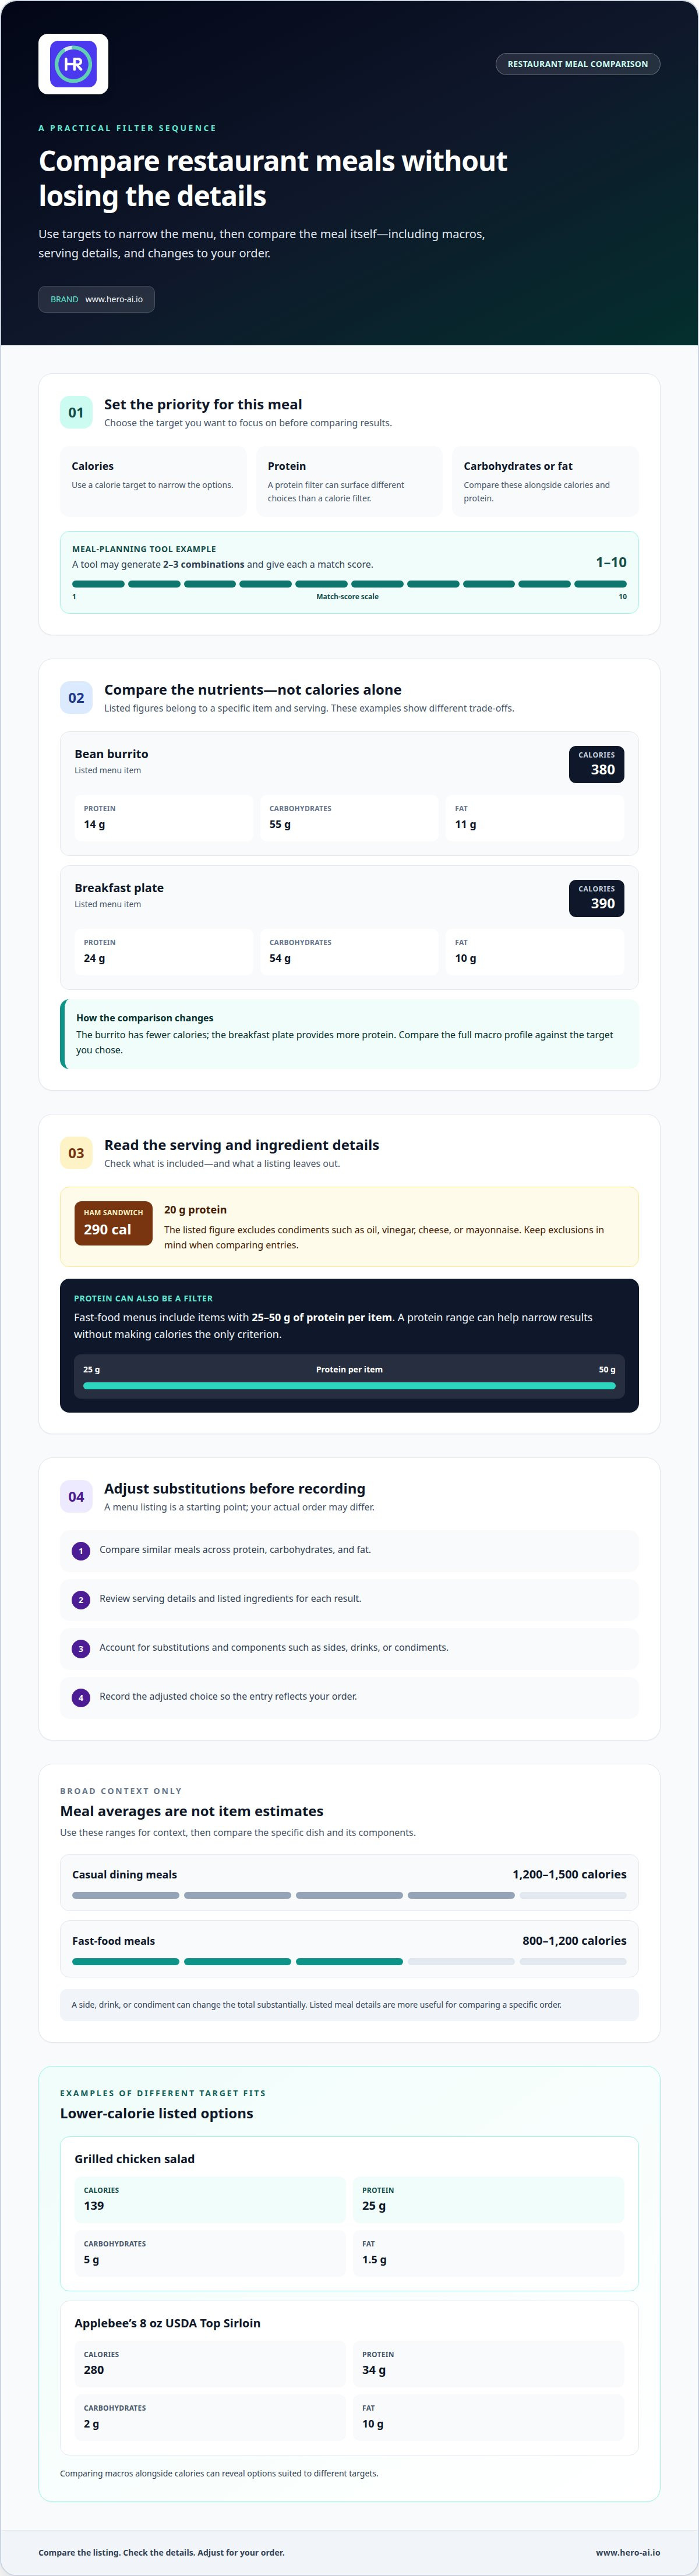
Restaurant listings can show nutrition for specific menu items. They differ from general meal averages because each figure belongs to a particular dish and serving. For example, a listed bean burrito contains 380 calories, 14 grams of protein, 55 grams of carbohydrates, and 11 grams of fat. A listed breakfast plate contains 390 calories, 24 grams of protein, 54 grams of carbohydrates, and 10 grams of fat.
Compare each macro alongside calories. The burrito has fewer calories, while the breakfast plate provides more protein. A listed ham sandwich has 290 calories and 20 grams of protein, excluding condiments such as oil, vinegar, cheese, or mayonnaise. Keep exclusions in mind when comparing entries.
Calorie and Macro Filters
Filters narrow meal choices by calories, protein, carbohydrates, or fat. Unlike a nutrition list, a filter sorts options against the targets you enter. A meal-planning tool may generate 2-3 combinations based on those targets and assign each a match score from 1 to 10. Use the score to compare options, then review the listed ingredients.
Start with the priority that matters most for that meal. A protein filter may surface different choices than a calorie filter. Fast-food menus include items with 25-50 grams of protein per item, so a protein range can help narrow results without making calories the only criterion.
Meal averages provide context, but they don’t describe every order. Casual dining meals average 1,200 to 1,500 calories, while fast-food meals average 800 to 1,200 calories. Use these ranges as a broad comparison, then focus on the listed meal and its components. A side, drink, or condiment can change the total substantially.
For a lower-calorie option, one listed grilled chicken salad contains 139 calories, 25 grams of protein, 5 grams of carbohydrates, and 1.5 grams of fat. An Applebee's 8 oz USDA Top Sirloin is listed at 280 calories, 34 grams of protein, 2 grams of carbohydrates, and 10 grams of fat. These examples show why comparing macros alongside calories can reveal options suited to different targets.
Use a consistent filter sequence:
- Set the calorie or macro target you want to prioritize.
- Compare matching meals across protein, carbohydrates, and fat.
- Read the serving and ingredient details for each result.
- Adjust the entry for substitutions before recording your choice.
This process makes menu listings easier to compare without treating every restaurant meal as equivalent.
Customizing meals and accounting for sauces, dressings, and toppings
A menu estimate changes when the ingredients do. Record each substitution, sauce, and topping so your log reflects your order rather than the standard dish.
Start with the main item, such as a chicken sandwich or burger. Then list what you remove, add, or request separately. A custom entry should distinguish a bunless burger from the standard version, and dressing on the side from dressing mixed into a salad. These details help explain differences between an app estimate and the meal served.
Small additions can shift the totals. A serving of ranch or mayonnaise can add 150-200 calories and 15-20 g of fat. Skipping a burger bun can save 25-40 g of carbohydrates and 150-200 calories per meal. Use these figures as adjustment cues, not as a substitute for a restaurant-specific listing. Portion size and recipe details still affect the estimate.
Adjust the Order Before Logging
Use a simple order-to-entry workflow. First, identify the base dish and its listed ingredients. Next, note each change, such as removing cheese, replacing a side, or asking for sauce separately. Finally, update the entry to match your customized order. For a chicken salad, for example, record the chicken, vegetables, dressing, and added toppings separately rather than treating the dish as unchanged.
Keep changes specific. “Less sauce” is harder to estimate than “dressing served separately.” If you use only part of a condiment, log the amount you actually used when the app allows ingredient-level edits. This makes a saved custom meal easier to reuse accurately.
Build a Custom Meal in a Nutrition Tracker
Custom recipe logging can help when a restaurant meal needs ingredient-level detail. In Cronometer, enter the meal’s components, such as a bun, patty, vegetables, cheese, and sauce. Adjust the entry to match your order, then reuse that custom meal record when you order the same combination.
This differs from selecting a standard menu item. You control the components, but need to enter the ingredients and portions yourself. Include the restaurant name and order description, such as “grilled chicken salad, dressing on side,” so you can distinguish the meal from similar entries later.
Before saving, compare the entry with the changes you requested. Check whether it includes the bun, dressing, toppings, and side. Save recurring combinations separately when their ingredients differ. A burger with mayonnaise and one without it shouldn’t use the same custom record.
For consistent tracking, follow the same steps each time: select the base item, apply substitutions, account for sauces, then save the edited meal. If the app can’t edit individual ingredients, record the components separately in your tracker. This preserves the difference between the restaurant’s standard dish and your customized order.
Can I save the scanned menu items for later?
Yes, if the app can save scanned or edited entries. Apps that estimate calories, protein, carbohydrates, and fat need to recognize a dish or its ingredients and match them with nutrition data. Before relying on a scan, check that you can edit and save the result for another visit.
Menu-photo OCR converts printed text into readable dish names and descriptions. Dish recognition then interprets details such as “grilled chicken,” “rice,” or “sauce served separately.” These are separate steps: a scan may capture menu text without identifying every ingredient or producing a complete macro estimate. Review the extracted name and description before saving.
For a useful comparison, assess each scan-and-save workflow using the same menu photo. Check whether the tool:
- Recognizes item names and ingredient details from the image.
- Separates a dish from its sides, toppings, or sauces.
- Displays calories, protein, carbohydrates, and fat.
- Lets you edit the result and save it under a clear name.
A menu photo, for example, may show several sandwiches with similar names. Saving the exact item and its customizations helps you tell the entries apart later.
Saved menu items are most useful when they’re easy to find again. Look for search, sorting, or filters that organize entries by restaurant, dish name, or nutrition values. If a scan creates a vague label such as “chicken meal,” rename it with identifying details, such as the restaurant and included side. A clear label makes it easier to select the right entry next time.
Menu-scanning comparisons should also consider how an app handles combination orders. A meal of soup, side salad, and a drink may not appear as one menu item. Save the components separately or combine them in a custom entry, then review the total. Keep optional dressings or toppings separate when they can be added individually.
Non-English menus add another recognition step. OCR must read the text, and the app must interpret the description well enough to identify the ingredients. Compare the scan with the original wording, especially for unfamiliar dish names or translated ingredient terms. If the tool misreads a menu line, correct the item manually before saving.
Use this sequence to create a reusable record: scan the menu, correct the item name, review the ingredients, edit the macros if needed, then save. A saved scan is a starting point, not a substitute for checking the selected dish. This helps preserve the exact menu item and its modifications for future visits.
Estimating unfamiliar dishes and portions
For an unfamiliar dish, build the estimate from its visible components. Identify the main protein, starch, vegetables, sauce, and cooking method. Then compare each component with a similar entry in your nutrition tracker. This is more useful than entering a broad name such as “mixed plate,” which may hide important ingredients and preparation details.
Start with the portion. Compare what you’re served with a familiar reference, such as a standard sandwich or a known bowl size. If the serving looks larger, adjust the component entries rather than changing the dish name. A Subway sandwich description, for example, can help identify bread, filling, and toppings, but portions at another restaurant may differ.
Cooking method matters. Pan-fried or sautéed dishes may contain added fat that isn’t obvious from the menu description. For unfamiliar dishes cooked this way, or with a visible gloss, add one to two tablespoons of butter or oil to your estimate. Treat this as an estimation step, and account for the restaurant’s actual preparation if the menu provides more detail.
Use this sequence when a menu gives limited information:
- Write down the named ingredients from the menu description.
- Separate mixed dishes into their main components.
- Estimate each portion using a comparable food entry.
- Account for sauces and cooking fats as separate components.
- Combine the entries and save a clear meal description.
For a grain bowl, estimate the grain, protein, vegetables, and dressing separately. For a casserole, identify the main ingredients and account for sauce or cheese. Breaking down the dish makes it easier to revise your estimate if you learn more about the recipe.
Photo-based estimates can help identify visible foods, but a photograph can’t reliably reveal every ingredient or preparation detail. A glossy sauce may contain oil, and a filling may be hidden under a topping. Use the image to describe what you can see, then add known menu details before recording the meal.
Listed macro estimates can vary with restaurant portions and cooking methods. Keep this in mind when comparing your estimate with a menu listing. For an unfamiliar dish, prioritize consistency over false precision: use the same component breakdown and portion approach each time you order it.
Save the finished entry with the dish name and its key components, such as “lentil stew with rice” or “grilled fish, potatoes, sauce.” That record gives you a usable starting point on a return visit. Continue estimating unfamiliar meals when you need a structured way to assess menu details.
Hero AI: 1 year subscription
Hero AI offers a 1 year subscription for readers considering a longer-term option. Use the criteria in this comparison to decide what you need from a meal-estimation tool, such as menu scanning, editable nutrition entries, and saved items. These features determine whether an option fits your restaurant tracking routine.
Before choosing, identify which tasks matter most: estimating unfamiliar dishes, recording customized orders, or returning to saved menu items. A subscription may suit readers who prefer a defined access period over selecting a tool for occasional use. Keep your priorities specific, then consider whether Hero AI’s 1 year subscription fits them.
For details, visit Hero AI online.
Choose a Tracking Routine You Can Maintain
Before choosing a restaurant meal macro estimator app, decide how you’d use it during a typical meal. Would you review menu details beforehand, record your order afterward, or keep a personal list of familiar dishes? A clear routine makes it easier to judge whether an app’s tools suit your needs.
Set a simple standard for your own records. Use consistent names for saved meals, note meaningful customizations, and update entries when your usual order changes. This keeps your food log useful without requiring every meal to follow the same pattern. Choose a workflow that fits your dining habits rather than adding steps you won’t maintain.
If you’re considering Hero AI, explore its offering and decide whether it fits your approach to meal tracking. Visit Hero AI to learn more and take the next step at your own pace.
Frequently Asked Questions
Can you accurately track calories when eating out?
Yes. A food tracker can record a restaurant meal, but the result depends on the details you enter. Choose the closest dish, account for its serving size, and add beverages or sides separately. For example, don’t log a grilled entrée with a shared side as the entrée alone. Preparation differences, added fats, and unrecorded condiments can change the total from the selected menu entry.
Does AI photo recognition work for Asian and local food?
AI photo recognition can identify visible foods and estimate portions, but unfamiliar dish names or ingredients may make the result less specific. A photograph may not reveal hidden fillings, sauces, or cooking fats. For a regional dish, enter its name or main ingredients when possible, then review the suggested food and portion. Correcting the entry gives your log more useful detail than accepting an unclear match.
Does it work for non-chain restaurants?
Photo-based food logging can help record meals from independent restaurants, even when a named menu item isn’t available. Describe the visible components, such as grilled fish, rice, and vegetables, then adjust the portions in your log. This differs from restaurant menu lookup, which relies on listed items. Include the restaurant name so you can recognize the meal again.
How many calories does a typical restaurant meal contain?
Casual dining meals average 1,200 to 1,500 calories, while fast-food meals average 800 to 1,200 calories. These ranges offer context, not a precise estimate for a particular order. A meal’s total changes with its components, portion size, sides, and condiments. For a more useful daily log, record the individual meal and additions instead of assigning it a category average.
What are the best restaurant meal macro estimator apps in the US?
The best option depends on whether you prioritize menu lookup, photo logging, macro details, or editable portions. Hero AI combines photo-based food logging with restaurant menu lookup for chains such as McDonald’s and Starbucks. Compare tools by how they handle the meals you order and how easily you can correct an entry. A useful app should fit your logging routine, not just offer a long list of features.
How accurate are restaurant meal macro estimates from apps?
Accuracy depends on how closely the logged item matches the meal served. Hero AI prioritizes verified nutrition data and uses AI estimates when a reliable database match isn’t available. Photo-based portion sizes are estimates, and you can adjust quantities in the app. For packaged items, barcode or nutrition-label scanning offers a more direct way to record the product’s stated information.
Which restaurant macro apps use menus, food photos, or AI?
These tools use different inputs. Menu lookup matches an order to listed restaurant items, while photo logging identifies visible foods and estimates portions. Hero AI supports photo-based food logging and uses AI estimation when a reliable database match isn’t available. Choose the input that suits your meal: a listed chain item, a customized plate, or a dish without a familiar menu name.
Which apps include nutrition information for major US restaurant chains?
Restaurant coverage varies by app and menu. Hero AI offers restaurant menu lookup for chains such as McDonald’s and Starbucks. Match the menu selection to the version you ordered, including changes to sides or ingredients. If a restaurant isn’t represented in the lookup, use a photo or manual food entry to record the meal in your tracker.


