

The most useful plant based meal macro scanner isn’t necessarily the one that produces the fastest photo estimate. Choose one that lets you review food entries, adjust portions, and compare protein, carbohydrates, and fat with your goals. That makes it easier to plan for weight loss or muscle gain without treating an automated estimate as an exact measurement.
It’s reasonable to want quick tracking and dependable numbers. Plant-based meals can combine several ingredients, so portions and ingredient details affect the totals. A scanner can simplify logging, but your goals and the way you build meals should guide your choice.
This article explains what to look for in a macro-tracking app, how to plan plant-based meals around your targets, and how to assess protein from foods such as lentils, tofu, tempeh, and beans. It also covers tracking accuracy, including why estimates can differ from what you eat and how to use trends rather than chase perfect daily numbers.
Key Takeaways
- Choose a tracker that lets you review and edit food entries, portions, and macro estimates.
- Use your weight-loss or muscle-gain goal to guide meal planning, rather than following a generic macro split.
- Build plant-based meals around protein sources such as lentils, tofu, tempeh, and beans.
- Compare photo estimates with ingredient and portion details to improve the usefulness of logged meals.
- Assess progress through patterns over time, not perfect numbers for every meal or day.
1. What is macro meal planning?
Macro meal planning organizes eating around protein, carbohydrates, and fat. It helps connect daily food choices with goals such as weight loss or muscle gain. Protein and carbohydrates each provide 4 calories per gram, according to the U.S. Department of Agriculture. Fat provides 9 calories per gram. These values help explain how each nutrient contributes to a meal’s energy total.
Planning macros doesn’t require fixed menus. A flexible approach leaves room for different cuisines, ingredients, and schedules while keeping portions aligned with your targets. For example, one meal might combine lentils, vegetables, and grains, while another features tofu and potatoes. The food choices change, but the tracking method stays consistent.
Start by recording the foods you usually eat, then identify where your protein, carbohydrates, and fat come from. Build a grocery list around that plan, including beans, tofu, whole grains, vegetables, and a source of unsaturated fat. Check portions and meal combinations before shopping. This makes it easier to adjust recipes without removing foods you enjoy.
Nutrient density is another consideration when planning meals. Beans, vegetables, and brown rice provide a different mix of nutrients from a meal built around a refined snack. You still need to track portions, but reviewing ingredients helps you consider more than calories. A flexible plan can include favorite foods while making nutrient-dense ingredients regular choices.
Food databases may include verified entries and user-submitted records. A verified entry may match a product label or standard food description. User submissions can cover specific recipes and foods, but details may vary. Before logging, compare the serving size and nutrient information with the package or recipe.
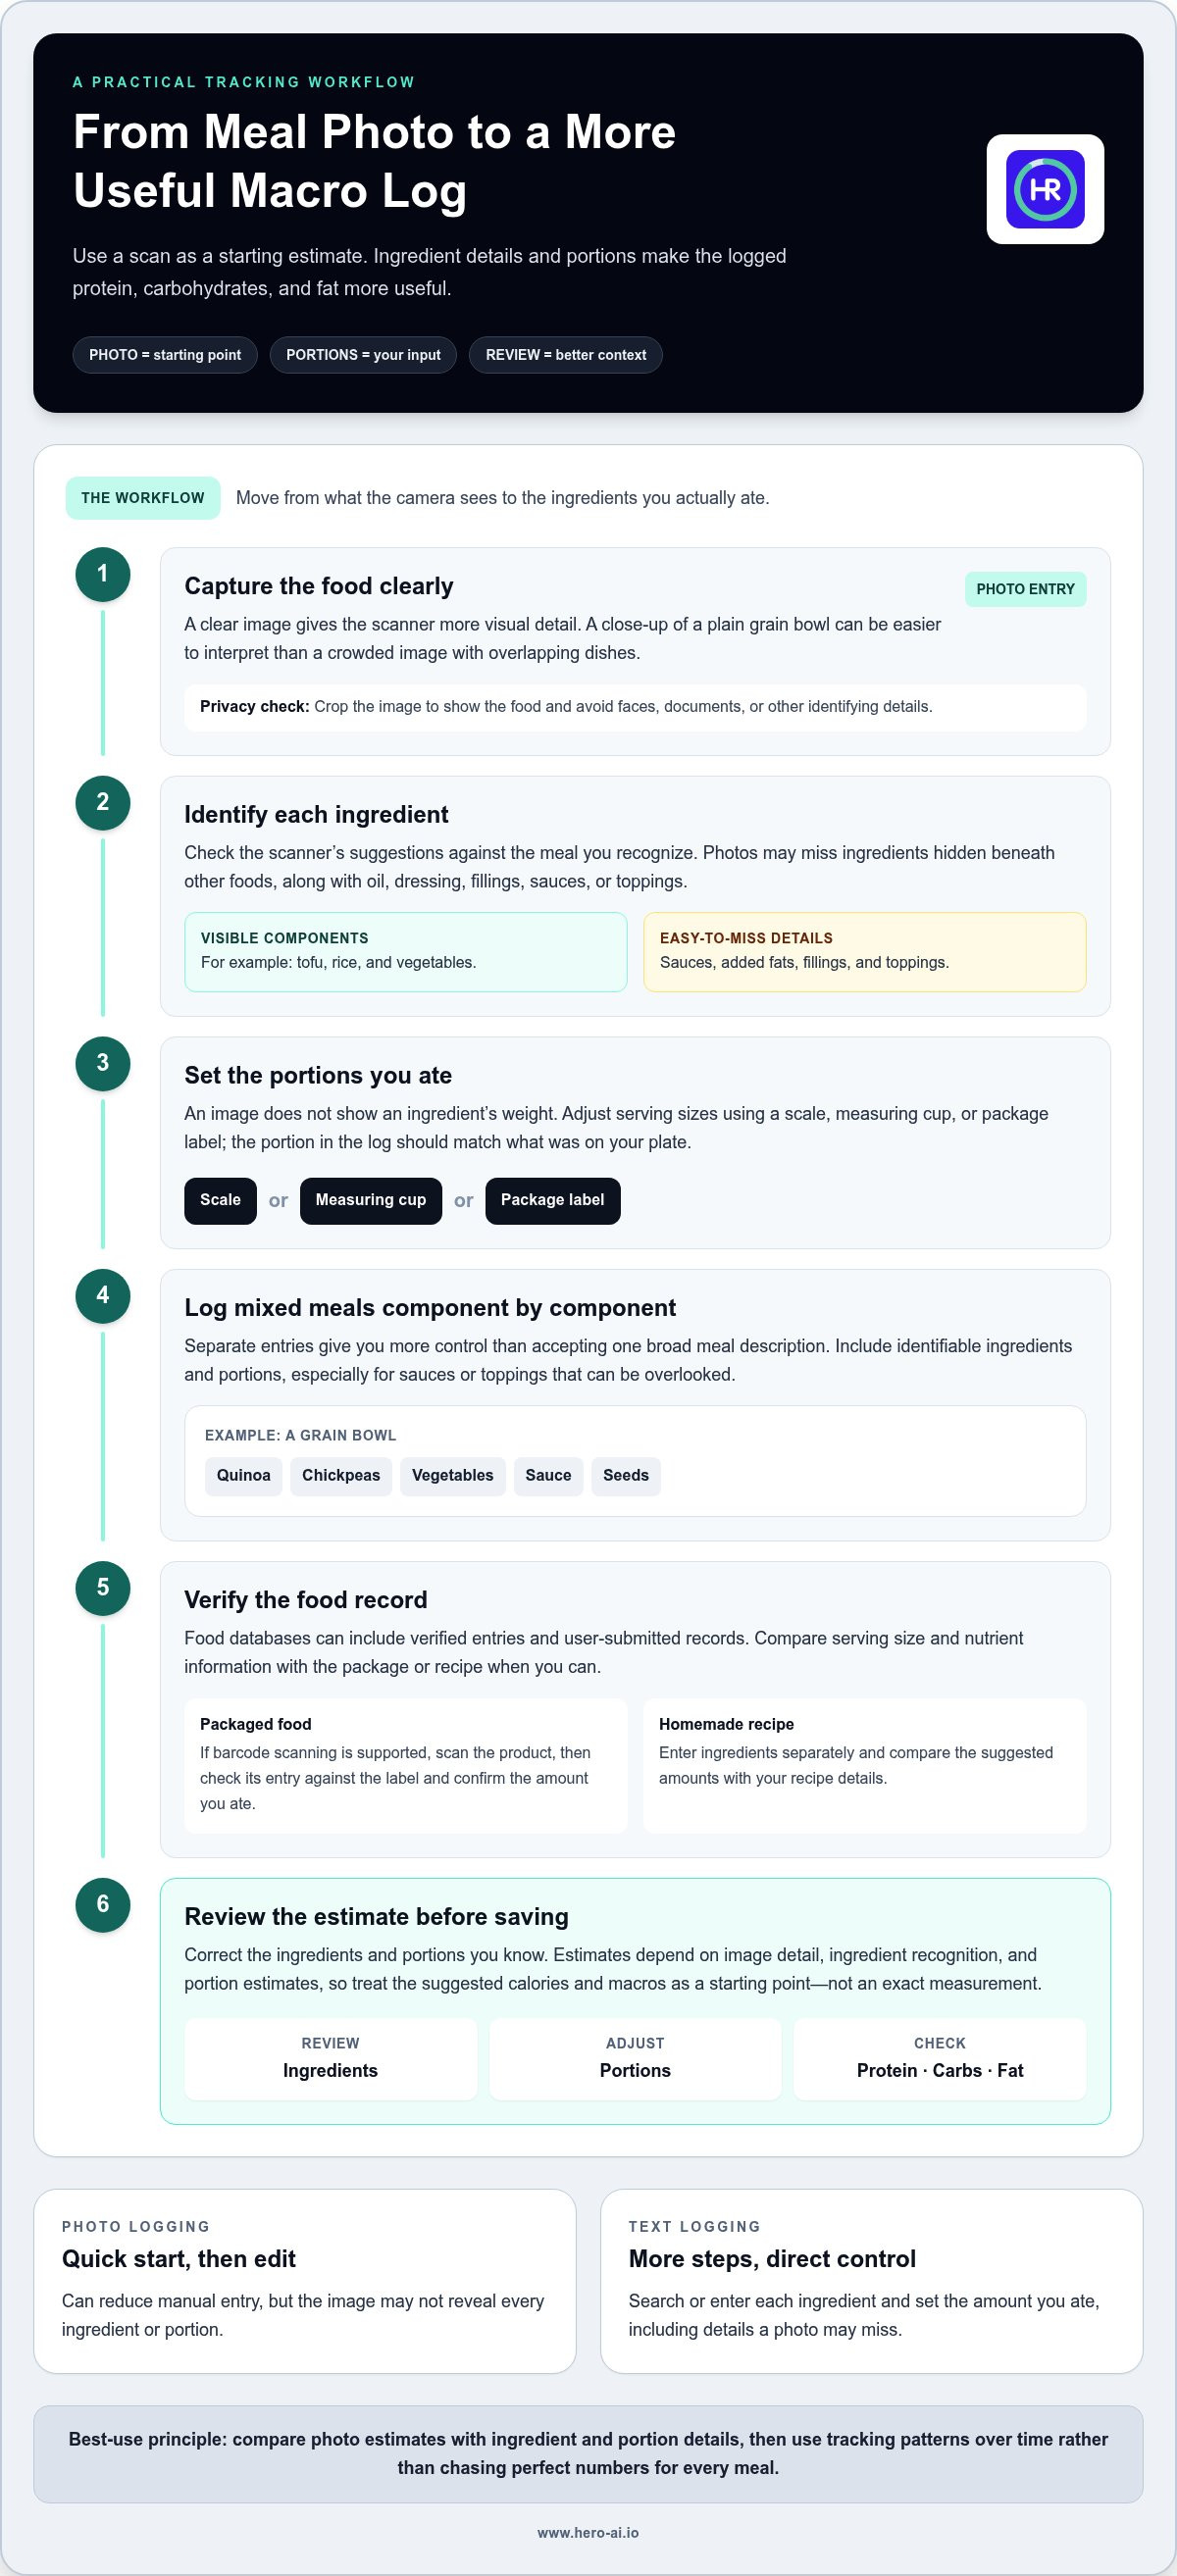
Photo logging can estimate a meal quickly, but an image doesn’t show every ingredient or its weight. Weighing ingredients lets you log each one and its portion separately. For a homemade bowl, weighing the rice, beans, and dressing gives the app clearer inputs than a single image. Use photos for convenience, then edit the ingredients and serving sizes you can identify.
For packaged foods, scan the barcode when the app supports it, then compare the entry with the package label. Confirm the serving size and how much you ate. A barcode can identify a product, but the logged portion still needs to match what you put on your plate.
To scan a plant-based meal, take a clear photo, identify each ingredient, and adjust portions using a scale, measuring cup, or package label. For a more useful estimate, log the components of a mixed meal separately instead of accepting one broad entry.
Restaurant meals call for the same ingredient-by-ingredient approach. A grain bowl might include quinoa, chickpeas, vegetables, sauce, and seeds. Log identifiable components separately, and account for sauces or toppings that are easy to overlook.
Meal photos may also capture faces, documents, or clues to your location. Crop images to show the food, review the app’s privacy settings and photo permissions, and avoid uploading identifying details.
2. So, which macro tracking app should you choose?
Choose an app based on how you prefer to record meals and review results. Look for tools that let you edit ingredients, serving sizes, and macro totals. For example, check whether you can correct the ingredients in a lentil bowl after scanning. Also consider whether the food database includes the foods and packaged products you eat regularly. A plant based meal macro scanner should work well with the foods you log most often.
Photo-based tracking can reduce manual entry. A meal image may help identify visible ingredients such as tofu, rice, and vegetables, but the estimate depends on what the camera can show. Oil, dressing, fillings, and ingredients beneath other foods can be hard to identify. Treat a scan as a starting point, then adjust the components and portions you recognize.
Text-based logging gives you direct control over the meal description. Enter a recipe or search for each ingredient, then set the amount you ate. This takes more steps but can capture ingredients a photo misses. For a homemade curry, record the chickpeas, coconut milk, vegetables, and rice separately. When available, compare database entries with package labels or your recipe.
AI photo scanning can suggest foods and estimate calories or macros. Results depend on image detail, ingredient recognition, and portion estimates. A close-up of a plain grain bowl provides clearer visual information than a crowded image with overlapping dishes. Review the suggested entry before saving it, especially when sauces or added fats affect the total.
AI photo logging is most useful when it reduces repetitive typing while still letting you correct errors. Check whether you can edit individual components, save frequent meals, or enter a recipe. These features affect how well tracking fits your routine. Repeatable breakfasts and lunches may be easier to log than meals with unfamiliar ingredients every day. When comparing options, check whether each plant based meal macro scanner lets you correct its suggestions.
Can meal scanners identify protein, carbs, fat, fiber, and micronutrients? They can estimate nutrients using the app’s food data, but a photo alone doesn’t reveal every ingredient or portion. Review the listed values and correct the food entry when you know the recipe or package details.
Do plant-based macro scanners connect with calorie trackers and fitness apps? Some apps may offer integrations, while others keep food records within one platform. Compare the available connection options and decide whether you need shared meal data or prefer to track separately.
Before choosing, test the same meal using photo entry and text entry. Compare the estimated components, editing steps, and time needed. An app that supports your preferred method and lets you correct records is more practical for ongoing tracking. For another way to organize nutrition tracking, explore AI-powered meal tracking.
3. Protein-rich foods and meeting protein goals
Protein intake on a plant-based diet depends on the foods and portions in each meal. Legumes, soy foods, seitan, and grains all contribute protein, but the amounts vary. Logging individual ingredients shows which meals provide substantial protein and where your meal plan might need adjustment.
One suggested intake range for people pursuing weight loss, muscle building, or toning is 0.8 to 1 gram per pound of bodyweight. Another approach uses lean body mass, with a suggested range of 0.7 to 1 gram per pound. These are different calculation methods. Choose the method that matches how your target is set, then calculate daily intake consistently.
For example, someone with 128 pounds of lean body mass would get a target of roughly 90 to 128 grams per day using the lean-mass method. That example shows how the calculation works. It does not mean every person needs the same target. A tracking app can total logged foods against your selected goal.
Plant proteins can contribute both protein and other macros. One cooked cup of lentils provides 18 grams of protein and roughly 40 grams of carbohydrates. A cooked cup of chickpeas provides 15 grams of protein, 45 grams of carbohydrates, and 4 grams of fat. Half a cup of tempeh provides 15 grams of protein and 9 grams of fat.
Other useful entries include:
- A 3-ounce serving of seitan, with 21 grams of protein.
- Half a cup of firm tofu, with 10 grams of protein.
- Edamame can contribute protein and carbohydrates to a meal.
- A cup of cooked quinoa, with about 8 grams of protein and 39 grams of carbohydrates.
Use portions to build meals around your target. For example, combine tempeh with a grain and vegetables, then log each component. If the total falls below your goal, include a protein-rich ingredient in a later meal. This ties the calculation to the food you actually eat rather than to a meal label.
A common plant-based macro split is 50% carbohydrates, 20% protein, and 30% fat. At 2,000 calories, an 80/10/10 split provides 50 grams of protein. These examples show why a macro percentage and a gram target can produce different outcomes. Check both the energy split and protein grams in your tracker.
For easier logging, save frequently eaten combinations as recipes. A pot of lentils or chickpeas can provide protein across several meals, and recording separate portions makes intake easier to calculate. Review your weekly entries for meals that repeatedly fall short, then adjust ingredients or serving sizes to match your chosen target.
4. Accuracy limitations of nutrition tracking apps
A nutrition app calculates totals from selected foods, portions, and database entries, so every input matters. A lentil stew logged as a generic recipe may differ from one entered with its actual lentils, vegetables, and oil. Macro tracking is most useful when the recorded ingredients match the meal you ate.
Food databases may include entries with different serving descriptions or nutrient values. Selecting “cooked lentils” instead of “dry lentils” changes the food and its nutritional profile. Check the entry name, preparation state, and serving unit before saving it. For packaged products, compare the app entry with the label and select the matching product.
Portion estimates are another source of variation. A cup, spoonful, or “medium” serving can represent different amounts for different foods and people. Weighing an ingredient provides a more consistent input than estimating by sight. If weighing isn’t practical, use the same measuring cup or portion method for meals you repeat.
Cooking can change food weight and nutrient concentration. Grains absorb water, vegetables lose water, and added oil changes a recipe’s fat total. Record foods in the same state as the database entry. For a batch recipe, enter the ingredients, note the finished portions, and log the portion you actually eat.
Photo estimates have limits: a camera captures visible features, not hidden ingredients or exact quantities. A vegetable curry may conceal oil, coconut milk, or legumes. After scanning, review each suggested component and correct ingredients the image can’t show. Clear photos help identify foods, but they don’t replace portion information.
Restaurant meals are harder to measure because recipes and serving sizes vary. A grain bowl may include an unlisted dressing or more grains than the app assumes. Record known ingredients separately and handle uncertain components consistently. This keeps the log useful for comparison, even when the exact recipe isn’t available.
Daily totals can vary because estimates and portions vary. Assess macro-tracking progress using weekly averages rather than expecting perfect daily numbers. Compare consistent meals and patterns across the week. A repeated breakfast, for example, can provide a steadier reference than a one-off restaurant meal.
Use the app to track your intake, not as a direct measure of your body’s response. For muscle gain or weight loss, compare your logged intake with changes in the progress measures you’ve chosen over time. If the trend doesn’t match your goal, review recurring entries first. Check portions, cooking details, and database selections before adjusting your meal plan.
5. Which apps can scan plant-based meals to estimate calories and macros?
Choose an app by testing it with a meal you eat often. A lentil and rice bowl can show whether its scanner identifies separate ingredients or assigns one broad meal entry. Check whether you can edit the result and view calories, protein, carbohydrates, and fat together. The best fit is the app whose workflow supports your tracking habits.
Compare photo scanning with manual search using the same meal. Take a clear photo of tofu, vegetables, and noodles, then review the suggested foods. Next, enter those ingredients through text search. See which method lets you correct portions and remove incorrectly identified components. This comparison shows whether image recognition saves effort without limiting your control.
App descriptions may use terms such as “AI food scanner” or “meal photo logging,” but those labels don’t explain how much editing the process allows. Test practical tasks: can you change tofu to tempeh, add a sauce, or separate a side dish? A scanner that accepts corrections is more useful for mixed plant-based meals.
Review these functions during a trial meal entry:
- Ingredient editing for foods such as beans, grains, sauces, and toppings.
- Portion controls that match the serving you actually ate.
- Macro displays that show the meal’s protein, carbohydrates, and fat.
- Saved meals or recipes for repeated dishes, such as overnight oats.
Compare how each app handles packaged plant-based foods, too. A scan may identify a product, but its serving size determines the amount logged. Use a package of soy yogurt as a test. Check that the selected item and portion reflect what you ate, rather than defaulting to the entire package.
Restaurant meals offer another useful comparison. Try logging a vegetable curry with rice and visible sauce. If the photo result combines everything, check whether you can separate the rice, curry, and toppings afterward. Manual editing matters because a mixed dish may contain ingredients that aren’t apparent in an image.
Before settling on a scanner, enter several familiar meals in each app. Include a packaged snack, a homemade recipe, and a mixed dish. Compare the suggested foods, editing steps, and final macro display. Don’t choose based on one attractive scan. A consistent process for lentils, tofu, and prepared foods will better support a long-term meal plan.
Hero AI: 1 year subscription
Hero AI offers a 1 year subscription as an option to consider after comparing meal-tracking approaches. Use the criteria in this guide to clarify what you need from a nutrition tool, such as a workflow that fits your routine and supports your goals. Before choosing a subscription, decide whether you prefer photo logging, text entry, or a combination. Consider which meals you track most often and how you want to review nutrition information. This makes it easier to assess whether an option fits your intended use. For information about Hero AI, visit Hero AI online.
Make Your Tracking Routine Work for You
Set a clear purpose for tracking before choosing your next step. You might want to understand your usual portions, support a training goal, or make meal planning more consistent. That purpose helps determine which records matter and how much detail is practical. A plant-based meal macro scanner is one tool in the process, not a substitute for deciding what information is useful to you.
Choose a familiar meal and create a repeatable way to log it. Review the ingredients, portions, and entries you tend to change. Use that routine to judge whether the tool fits your daily habits. Small, consistent adjustments can make your records more useful without turning every meal into a detailed project.
If you want to explore Hero AI as a next step, contact Hero AI for help. You can consider how its option fits your preferred tracking approach and goals. A clear process gives you a practical starting point, and you can refine it as your needs change.
Frequently Asked Questions
So, which macro tracking app should you choose?
Choose an app that matches how you record meals and review nutrition information. If you cook from recipes, prioritize ingredient editing and saved meals. If you often buy packaged foods, barcode and label scanning can reduce manual entry. Test the same familiar dish in each app you’re considering. Compare how easily you can correct ingredients, adjust portions, and review the final nutrient breakdown.
What is macro meal planning?
Macro meal planning means choosing foods and portions with protein, carbohydrates, and fat in mind. It turns a nutrition target into practical meal choices. Plan a grocery list around ingredients you can use in several dishes, then vary the seasonings and vegetables. This supports a consistent routine without requiring identical meals every day or excluding foods you enjoy.
What should I eat to meet my macros?
Build meals around foods that help meet the macro target you’re focusing on. For example, combine a legume-based dish with grains and vegetables, then add a suitable fat source if your plan calls for it. Review the ingredient totals rather than judging a meal by its name. If one meal leaves a gap, choose an ingredient in a later meal to help balance your day.
How accurate are photo-based macro scanners for plant-based meals?
Photo scanners provide estimates based on visible ingredients and portion assumptions. A clear image of separate foods gives the scanner more detail than a crowded plate, but photos can’t show exact weights or reliably reveal hidden oil and sauces. Use the scan as a draft, then correct ingredients and portions using your recipe, package details, or serving measurements.
Which plant-based foods and mixed dishes are hardest for macro scanners to recognize?
Mixed dishes can be difficult to scan because ingredients overlap or sit beneath sauces. A blended soup may conceal legumes, vegetables, and added fats. A stuffed wrap can hide its filling, while a layered casserole may appear as one item. Improve the record by entering the dish’s components separately and accounting for toppings, dressings, and cooking ingredients.
How do macro scanner apps compare in features, ratings, and supported diets?
Compare functions that affect your actual logging routine, such as photo recognition, barcode scanning, portion edits, and recipe entry. Ratings can summarize user feedback, but they don’t show whether an app suits your meals. Hero AI states that it provides photo and barcode food logging, plus a database of 3 million-plus verified foods. Check whether the foods and logging options match your dietary pattern.
How much do plant-based meal scanning apps cost in the United States?
Meal-scanning apps don’t have a standard cost. Subscription terms and included features vary, so compare what each plan provides before choosing. Look for details such as photo logging, barcode tools, recipe functions, and subscription duration. Don’t compare plans by a headline price alone. Consider which features you’ll use regularly and whether the billing period suits your plans.


